- Add DOB and Mobile No. field to WooCommerce Registration Form
WooCommerce is a great plugin for building an e-commerce store. It’s a really awesome out of the box plugin to quickly build e-commerce store. In this article, we are going to see how we can add “First Name”, “Last Name”, “Mobile No.” and “Date of Birth” fields to the WooCommerce registration form.
The main idea behind capturing “Mobile No.” and “Date of Birth”, fields is we let say we can send for instance a “Special Discount” for a particular user on his birthday, or maybe we can send some special “coupon code” to the registered Mobile No. entered while registration for the WooCommerce store.
Note: To send SMS to registered Mobile No. an SMS API required which is beyond the scope of the article.
This becomes very important for it this today’s very competitive marketing strategies, to go the extra mile and have this kind of strategy implemented.
Basic registration for of WooCommerce
To start with firstly we will have a look at current registration form of WooCommerce installed with 2016 WordPress Child theme.
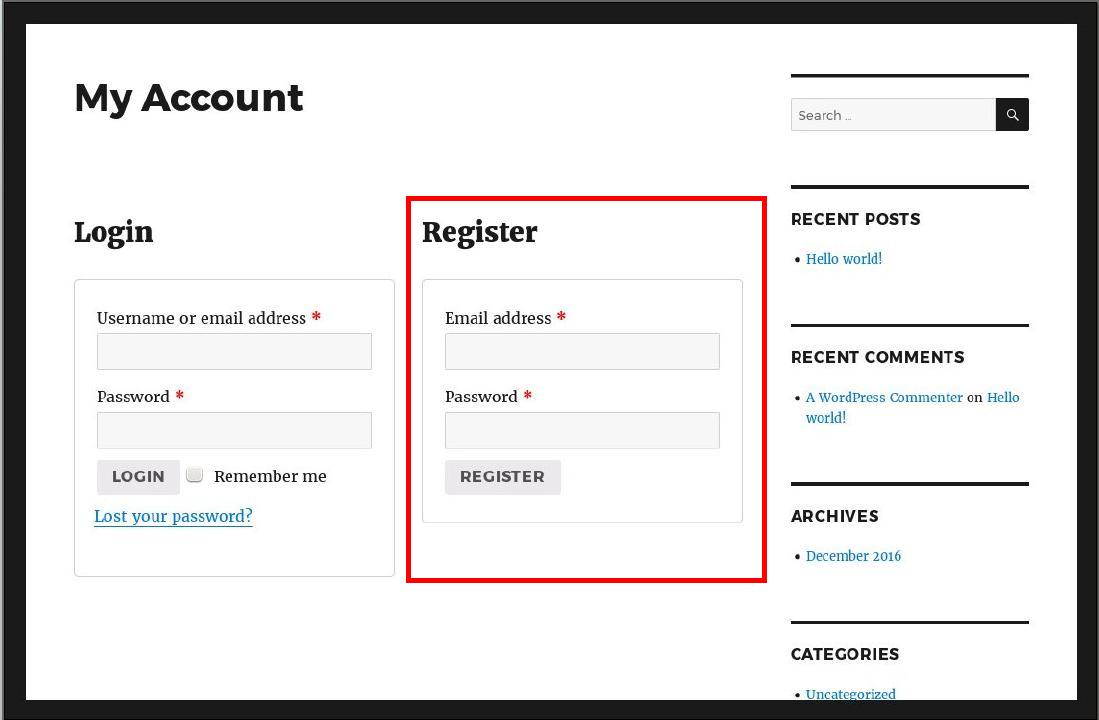 Screenshot 1: Basic Registration form of WooCommerce
As per above screenshot, we see that there is a very basic registration form of WooCommerce and the following screenshot shows what we want to achieve,
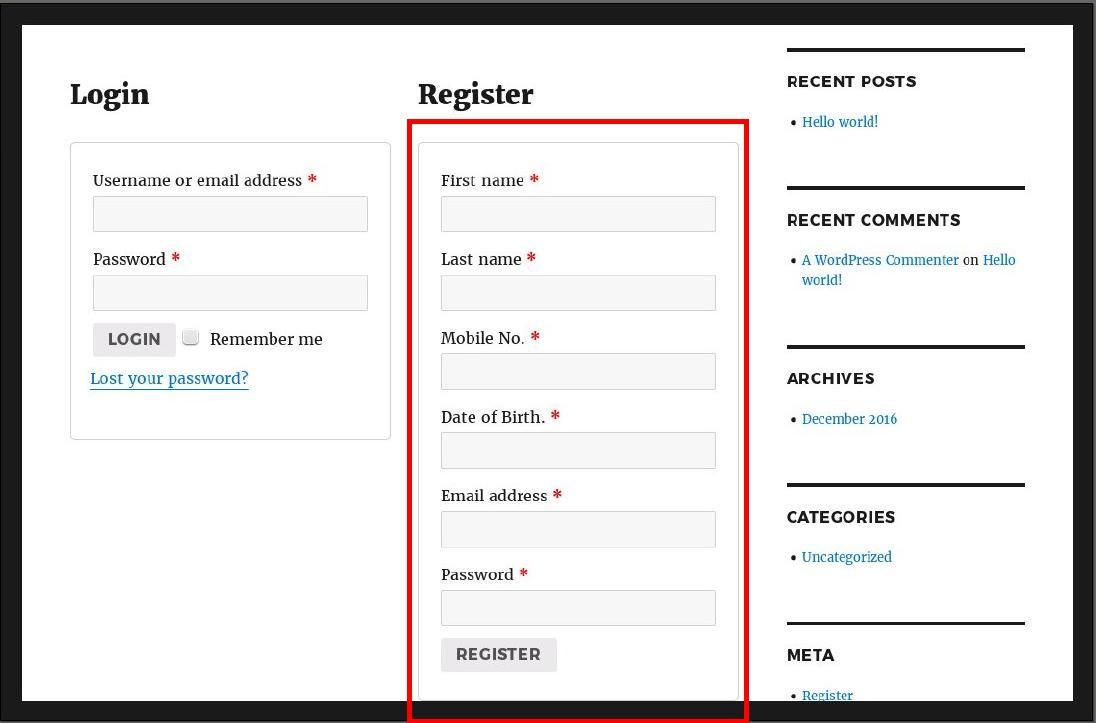 Screenshot 2: Customized Registration for of WooCommerce
So Let’s start coding it,
Adding fields to Woocommerce Registration Form
First of all, Login and Registration form code is located in following directory path
Original Path :
WORDPRESS_INSTALLATION / wp-content/plugins/woocommerce/templates/ myaccount/form-login.php
Let’s copy “form-login.php” file to the child theme and customize it the way we want it to the following path.
Child Theme Path :
WORDPRESS_INSTALLATION/wp-content/CHILD_THEME/woocommerce/templates/myaccount/form-login.php
After that, if we look into “form-login.php” code there is an inbuilt action hook around line no 79 called “woocommerce_register_form_start“, by using this action we are going to inject extra fields to the registration form of WooCommerce.
There are also other action hook options are available such as,
- woocommerce_register_form
- register_form
- woocommerce_register_form_end
Since I want to Inject extra fields in the registration form of WooCommerce before E-mail address field, I will use “woocommerce_register_form_start” action hook. You may use any one of the three available hooks depending on your preference or you can manually add code for additional fields into “form-login.php” by hand coding and since we are making changes to file in child theme it will not have an effect on original “form-login.php”.
Here is code snippet for adding fields, put it in functions.php file of the child theme.
function my_woo_register_extra_fields() {
	?>
	<p class="woocommerce-FormRow woocommerce-FormRow--wide form-row form-row-wide">
	  <label for="billing_first_name"><?php _e( 'First name', 'woocommerce' ); ?> <span class="required">*</span></label>
	  <input type="text" class="woocommerce-Input woocommerce-Input--text input-text requiredField" name="billing_first_name" id="billing_first_name" value="<?php if ( ! empty( $_POST['billing_first_name'] ) ) echo esc_attr( $_POST['billing_first_name'] ); ?>" />
	</p>

	<p class="woocommerce-FormRow woocommerce-FormRow--wide form-row form-row-wide">
	  <label for="billing_last_name"><?php _e( 'Last name', 'woocommerce' ); ?> <span class="required">*</span></label>
	  <input type="text" class="woocommerce-Input woocommerce-Input--text input-text requiredField" name="billing_last_name" id="billing_last_name" value="<?php if ( ! empty( $_POST['billing_last_name'] ) ) echo esc_attr( $_POST['billing_last_name'] ); ?>" />
	</p>

	<p class="woocommerce-FormRow woocommerce-FormRow--wide form-row form-row-wide">
	  <label for="billing_phone"><?php _e( 'Mobile No.', 'woocommerce' ); ?> <span class="required">*</span></label>
 	  <input type="text" class="woocommerce-Input woocommerce-Input--text input-text requiredField" name="billing_phone" id="billing_phone" value="<?php if ( ! empty( $_POST['billing_phone'] ) ) echo esc_attr( $_POST['billing_phone'] ); ?>" />
	</p>

	<p class="woocommerce-FormRow woocommerce-FormRow--wide form-row form-row-wide">
	  <label for="my_user_dob"><?php _e( 'Date of Birth.', 'woocommerce' ); ?> <span class="required">*</span></label>
	  <input type="text" class="woocommerce-Input woocommerce-Input--text input-text requiredField" name="my_user_dob" id="my_user_dob" value="<?php if ( ! empty( $_POST['my_user_dob'] ) ) echo esc_attr( $_POST['my_user_dob'] ); ?>" />
	</p>

	 <div class="clear"></div>
	 <?php
 }
 add_action( 'woocommerce_register_form_start', 'my_woo_register_extra_fields' );
So after adding the above code snippet, we get the result as shown in Screenshot 2.
Attaching Jquery Date picker to Date of Birth field of Woocommerce registration form
Until now we have the form ready, Let’s now add Jquery Datepicker for DOB field.
To add jquery Datepicker we need two things,
- Create a CSS folder in Child Theme and under that download jQuery.css from https://jqueryui. com/datepicker/
- Also, create a JS folder in Child Theme and create as site.js Javascript file and copy paste following code snippet into it.
jQuery('#my_user_dob').datepicker({
		changeYear: true,
	       defaultDate:(new Date(1950, 1 , 1)),
	       yearRange: '1950:2017',
		dateFormat: 'dd-mm-yy'
});
The Datepicker javascript code is attached to field with id ‘my_user_dob’ if you look at code snippet, the default DOB fields are set to “1-1-1950”, with year range from 1950 to 2017 and the date format is ‘dd-mm-yy’. With this code snippet, the jquery Datepicker should be working.
Now we have to include these CSS and JS files so that we can use it
function add_front_end_scripts()
{
  /*Load Scripts  Files*/
  $url = site_url();
  if( !wp_script_is( 'jquery-ui-datepicker', 'enqueued') && is_page( 'my-account' ))
  {
   wp_enqueue_script('jquery-ui-datepicker');
  }
  wp_enqueue_style( 'parent-css', get_template_directory_uri() . '/style.css' );
  wp_enqueue_style('jquery-ui-css',esc_url( get_stylesheet_directory_uri() )."/css/jquery-ui.css");
  wp_register_script('site-js', get_stylesheet_directory_uri() ."/js/site.js","","", true );
  wp_enqueue_script('site-js');
}
add_action('wp_enqueue_scripts','add_front_end_scripts');
First of all, we check if jQuery Datepicker Js is enqueued or not. we put a check where to enqueue this Datepicker file. If the page is “my-account” (which is default account page of the WooCommerce customer) then only we enqueue jQuery Datepicker JS file. On the similar basis, we add “jquery-ui-css.css” and “site.js” file.
Saving the Registration fields of woocommerce
The code snippet for saving the form data is,
function my_save_extra_register_fields( $customer_id ) {

   if ( isset( $_POST['billing_first_name'] ) )
   {
    //First name which is User meta
    update_user_meta( $customer_id, 'first_name', sanitize_text_field( $_POST['billing_first_name'] ) );
    // Billing First name field of  WooCommerce
    update_user_meta( $customer_id, 'billing_first_name', sanitize_text_field( $_POST['billing_first_name'] ) );
   }
   if ( isset( $_POST['billing_last_name'] ) )
   {
     //Last name which is User meta
     update_user_meta( $customer_id, 'last_name', sanitize_text_field( $_POST['billing_last_name'] ) );
     // Last First name field of  WooCommerce
      update_user_meta( $customer_id, 'billing_last_name', sanitize_text_field( $_POST['billing_last_name'] ) );
   }
   if ( isset( $_POST['billing_phone'] ) )
   {
     // Mobile No. input filed (Billing Phone of WooCommerce)
     update_user_meta( $customer_id, 'billing_phone', sanitize_text_field( $_POST['billing_phone'] ) );
   }
   if ( isset( $_POST['my_user_dob'] ) )
   {
     //DOB name which is User meta
     update_user_meta( $customer_id, 'my_user_dob', sanitize_text_field( $_POST['my_user_dob'] ) );
   }
 }
 add_action( 'woocommerce_created_customer', 'my_save_extra_register_fields' );
Displaying Saved registration form Data in My account page of Wocommerrce
When the registration is successfully done it will take to “My Account page” which will look like this,
Screenshot 3: My Account Page after WooCommerce Registration.
The first three fields Fields
- First Name,
- Last Name,
- Mobile No
are shown in “Address” section of My Account page and the link is “My Account > Addresses > Edit“.
 Screenshot 4: My Account > Addresses > Edit Link
Under that click on “Edit” Billing Address Link which will open the following page.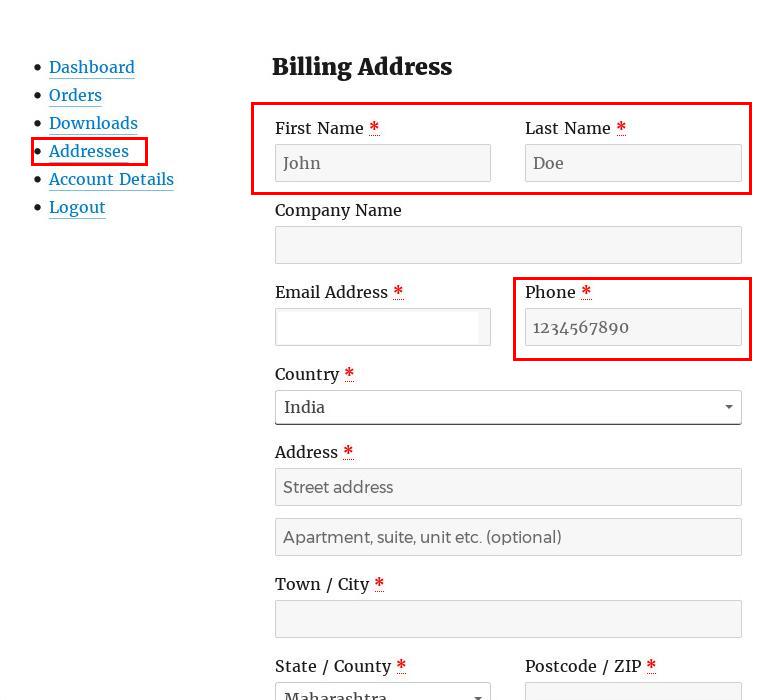
Screenshot 5: My Account > Addresses > Billing Address Edit Link
So you can see the First Name, Last Name and Phone are already populated. The only remaining field is Date of Birth since It is not an inbuilt field of WooCommerce It has to be custom coded to be displayed. We will display it in “Account Section” and for that WooCommerce provides another action hook for editing “Account Details Section” “woocommerce_edit_account_form”.
Now the final code snippet for displaying “Date of Birth” form field in “Account details section”
 function my_woocommerce_edit_account_form() {

  $user_id = get_current_user_id();
  $user = get_userdata( $user_id );
  if ( !$user ) return;
  $user_dob = get_user_meta( $user_id, 'my_user_dob', true );
  $url = $user->user_url;
  ?>
  <fieldset>
    <legend>Extra Data</legend>
    <div class="form-group">
     <label for="my_user_dob">
       <?php _e( 'Date of Birth.' , 'woocommerce' ); ?>
       <span class="required">*</span>
     </label>
    <input type="text" class="form-control my_user_dob requiredField" name="my_user_dob" id="my_user_dob" disabled="disabled" value="<?php echo esc_attr( $user_dob ); ?>" />
   </div>
   </fieldset>
   <?php
 }
 add_action( 'woocommerce_edit_account_form', 'my_woocommerce_edit_account_form' );
In the above code snippet, we first get the current logged in user details. If the user is not logged in we just return from the function without execution further logic.
After that, we get the DOB, which is saved in “User Meta” table and is display using a textbox. Since DOB does not change for a person, I have disabled the text box, and it should not be editable. If you want you can make it editable, but you need to write the logic for saving modified DOB field to the database.
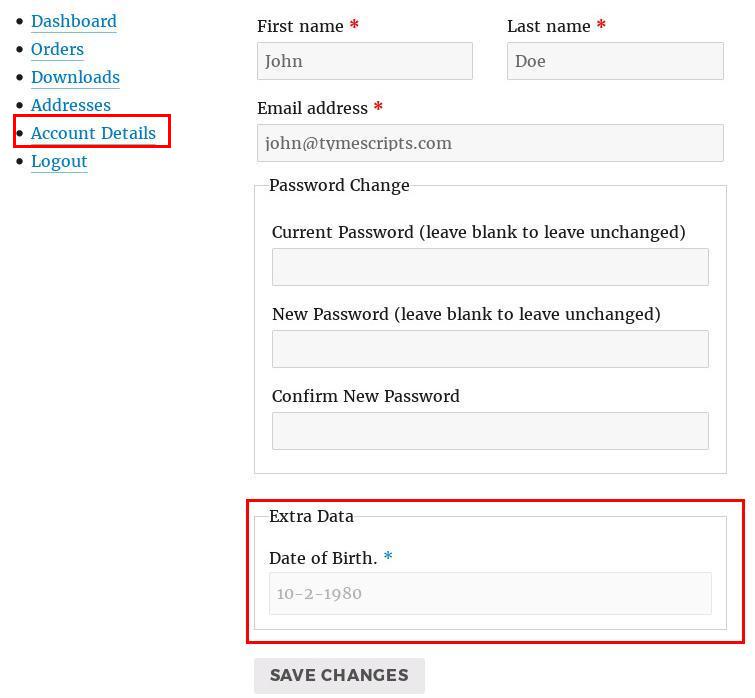 Screenshot 6: Account details with Date of Birth Field.
Note: Mobile No. field in Billing Address section is labeled as “Phone”. If you want you can change the Label to Mobile No. or keep it as it is. Also, we see “First Name” and “Last Name” in two screens one on Screenshot 5 and another in Screenshot 6. which is getting pulled from user meta Table.
In this article we saw how to add new fields to WooCommerce Registration Form. In the next article we will see how to validate form fields on form submit (both client and server side) and display the saved data from WooCommerce Registration form in Admin section of WordPress.